Gmssl openssl國密網絡傳輸加密
要不是因為要做這方面的應用估計是不會寫這邊文章了,因為從小白開始始終還是不容易的,里面有不對的地方還請大家多多吐槽
要不是因為要做這方面的應用估計是不會寫這邊文章了,因為從小白開始始終還是不容易的,里面有不對的地方還請大家多多吐槽。
好了言歸正傳,作為一名網工,加密傳輸是必不可少的課題,這次接觸了一個小課題,通過Gmssl 工具與OpenSSL 完成基于SM2國密數字證書及基于SM2證書的SSL/TLS集成,在這里我先暫時用集成,因為包括Gmssl與OpenSSL都是由國內與國際的專門組織維護,我只是拿來主義幸好都是開源的,在國內百度的時候真心沒有找到一篇完整的或者完全的集成文章,所以打算整理一下,寫個完整的流程(當然我也是個比較懶的人能省略的都推其他大神的文章了)也感謝他們的分享
我會分為四個步驟:
1、Gmssl的編譯
2、OpenSSLN的編譯
3、SM證書的生成
4、測試
5、抓包查看密鑰協商過程
1、Gmssl的編譯:
先介紹一下環境:
2臺虛擬機 一臺作為服務端,一臺作為客戶端
用的是Oracle的vbox 為了方便測試 將創建后的兩臺虛擬機橋接在同一張物理網卡上
系統環境 server與client 端采用的都是centos 7 3.10.0-1160.el7.x86_64
下載Gmssl
關于GmSSL
點擊Download 將下載的包文件上傳到centos目錄
或者 wget https://github.com/guanzhi/GmSSL/archive/master.zip
yum install gcc unzip 等編譯需要的基礎環境與工具
編譯安裝請參考
最后 openssl version
出現下面的提示就表示Gmssl編譯安裝并運行成功了

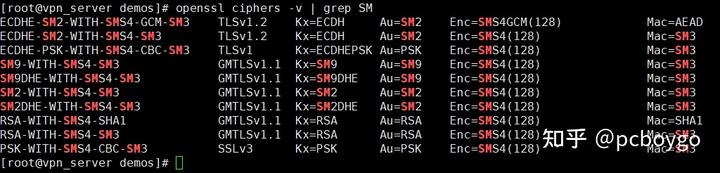
通過 openssl ciphers -v | grep SM
2、OpenN編譯
首先下載 OpenN源碼
https://openvpn.net/community-downloads/上面這個網站打開有點慢
我下載的是 openN-2.5.3
編譯安裝前先安裝如下依賴
yum install epel-release
yum install -y openssl-devel lzo lzo-devel pam pam-devel automake pkgconfig makecache
tar -zxvf openN-2.5.3.tar.gz #是不是可以直接yum open**n 個人覺得也是可以的但是沒有實際操作過
cd open**N-2.5.3
./configure
make && make install
不出意外可以在 /usr/local/sbin 目錄下查看到 可執行的open**N文件

兩臺虛擬機同樣的編譯工作在這里結束了,注意兩臺虛擬機的編譯過程都是一樣的
如果是實驗環境 建議在這里直接克隆一臺一模一樣的
3、生成證書
證書生成參考
2.證書生成準備:
在 home 目錄下 make dir apps/demoCA/
cd apps/demoCA/
mkdir certs crl newcerts private
touch index.txt
echo "01" > serial
3.生成根證書:
gmssl ecparam -genkey -name sm2p256v1 -text -out Root.key #生成私鑰
gmssl req -new -key Root.key -out Root.req #證書請求
gmssl x509 -req -days 3650 -sm3 -in Root.req -signkey Root.key -out RootCA.crt #生成根證書
4.生成服務端證書
gmssl ecparam -genkey -name sm2p256v1 -text -out Server.key #生成私鑰
gmssl req -new -key Server.key -out Server.req #證書請求
gmssl x509 -req -sm3 -days 3650 -CA RootCA.crt -CAkey Root.key -CAcreateserial -in Server.req -out ServerCA.crt #簽發證書
gmssl verify -CAfile RootCA.crt ServerCA.crt #證書驗證
gmssl x509 -in ServerCA.crt -text -noout #查看證書
5.生成客戶端證書
gmssl ecparam -genkey -name sm2p256v1 -text -out Client.key #生成私鑰
gmssl req -new -key Client.key -out Client.req #證書請求
gmssl x509 -req -sm3 -days 3650 -CA RootCA.crt -CAkey Root.key -CAcreateserial -in Client.req -out ClientCA.crt #簽發證書
gmssl verify -CAfile RootCA.crt ClientCA.crt #證書驗證
gmssl x509 -in ClientCA.crt -text -noout #查看證書
6.客戶端/服務端通信驗證
gmssl s_server -accept 443 -key Server.key -cert ServerCA.crt -dkey Server.key -dcert ServerCA.crt -CAfile RootCA.crt -msg -debug #服務端
gmssl s_client -connect 127.0.0.1:443 -key Client.key -cert ClientCA.crt -CAfile RootCA.crt -msg -debug #客戶端
驗證通過以后就可以開始采用 國密加密算法來加密**N隧道了
4、使用編譯好的openN 進行國密加密算法驗證:
1、首先啟動服務端

dh2048.pem ta.key 如果不想自己生成,可以直接在open**N源碼中找到

服務端的config文件需要修改的地方我先貼出來
[root@gm**N opt]# more open**N/server.conf nn;tls-auth /opt/open**N/ta.key 0 # This file is secretnn# Select a cryptographic cipher.n# This config item must be copied ton# the client config file as well.n# Note that v2.4 client/server will automaticallyn# negotiate AES-256-GCM in TLS mode.n# See also the ncp-cipher option in the manpagen# cipher AES-256-CBCncipher SMS4-CFBnn
在 /user/local/sbin 下找到open**N執行文件
[root@gm**Nsbin]# ./open**N --config /opt/open**n/server.conf
2021-09-19 10:06:50 WARNING: --topology net30 support for server configs with IPv4 pools will be removed in a future release. Please migrate to --topology subnet as soon as possible.n2021-09-19 10:06:50 DEPRECATED OPTION: --cipher set to 'SMS4-CFB' but missing in --data-ciphers (AES-256-GCM:AES-128-GCM). Future Open**n version will ignore --cipher for cipher negotiations. Add 'SMS4-CFB' to --data-ciphers or change --cipher 'SMS4-CFB' to --data-ciphers-fallback 'SMS4-CFB' to silence this warning.n2021-09-19 10:06:50 WARNING: file '/opt/open**N/server.key' is group or others accessiblen2021-09-19 10:06:50 Open**N 2.5.3 x86_64-pc-linux-gnu [SSL (OpenSSL)] [LZO] [LZ4] [EPOLL] [MH/PKTINFO] [AEAD] built on Aug 17 2021n2021-09-19 10:06:50 library versions: GmSSL 2.5.4 - OpenSSL 1.1.0d 19 Jun 2019, LZO 2.06n2021-09-19 10:06:50 net_route_v4_best_gw query: dst 0.0.0.0n2021-09-19 10:06:50 net_route_v4_best_gw result: via 172.16.15.254 dev em1n2021-09-19 10:06:50 Diffie-Hellman initialized with 2048 bit keyn[GMTLS_DEBUG] set sm2 signing certificaten[GMTLS_DEBUG] set sm2 signing private keyn2021-09-19 10:06:50 Initialization Sequence Completedn
服務端啟動完畢
2、客戶端啟動
客戶端配置文件
[root@client sbin]# more /opt/open**N/client.conf n##############################################n# Sample client-side Open**N 2.0 config file #n# for connecting to multi-client server. #n# #n# This configuration can be used by multiple #n# clients, however each client should have #n# its own cert and key files. #n# #n# On Windows, you might want to rename this #n# file so it has a .o**n extension #n##############################################nnn
啟動客戶端
[root@client sbin]# ./open**N --data-ciphers SMS4-CFB --auth-nocache --config /opt/open**N/client.conf
--data-ciphers SMS4-CFB 加這個參數是讓客戶端與服務端在第二階段加密隧道協商時采用 SMS4-CFB 對稱算法
--auth-nocache 這個參數是不讓認證信息留存在 計算機的緩存中,避免安全風險
./open**N --data-ciphers SMS4-CFB --auth-nocache --config /opt/open**N/client.conf n[root@client sbin]# ./open**N --data-ciphers SMS4-CFB --auth-nocache --config /opt/open**N/client.conf n2021-09-19 10:15:37 WARNING: file '/opt/open**N/client.key' is group or others accessiblen2021-09-19 10:15:37 Open**N 2.5.3 x86_64-pc-linux-gnu [SSL (OpenSSL)] [LZO] [LZ4] [EPOLL] [MH/PKTINFO] [AEAD] built on Jul 25 2021n2021-09-19 10:15:37 library versions: GmSSL 2.5.4 - OpenSSL 1.1.0d 19 Jun 2019, LZO 2.06n2021-09-19 10:15:37 WARNING: No server certificate verification method has been enabled. See http://open**N.net/howto.html#mitm for more info.n[GMTLS_DEBUG] set sm2 signing certificaten[GMTLS_DEBUG] set sm2 signing private keyn2021-09-19 10:15:37 TCP/UDP: Preserving recently used remote address: [AF_INET]58.20.231.166:61568n2021-09-19 10:15:37 Socket Buffers: R=[212992->425984] S=[212992->425984]n2021-09-19 10:15:37 UDP link local: (not bound)n2021-09-19 10:15:37 UDP link remote: [AF_INET]58.20.231.166:61568n2021-09-19 10:15:37 TLS: Initial packet from [AF_INET]58.20.231.166:61568, sid=8ec4ffb1 a71702a0n2021-09-19 10:15:37 VERIFY OK: depth=1, C=CN, ST=Hunan, L=xiangtan, O=Hunanshutong, OU=ca, CN=can2021-09-19 10:15:37 VERIFY OK: depth=0, C=CN, ST=Hunan, L=xiangtan, O=Hunanshutong, OU=server, CN=servern2021-09-19 10:15:37 Control Channel: TLSv1.2, cipher TLSv1.2 ECDHE-SM2-WITH-SMS4-SM3, peer certificate: 256 bit EC, curve sm2p256v1, signature: SM2Sign-with-SM3n2021-09-19 10:15:37 [server] Peer Connection Initiated with [AF_INET]58.20.231.166:61568n2021-09-19 10:15:37 PUSH: Received control message: 'PUSH_REPLY,route 1.1.1.0 255.255.255.0,route 10.8.0.1,topology net30,ping 10,ping-restart 120,ifconfig 10.8.0.6 10.8.0.5,peer-id 0,cipher SMS4-CFB'n2021-09-19 10:15:37 OPTIONS IMPORT: timers and/or timeouts modifiedn2021-09-19 10:15:37 OPTIONS IMPORT: --ifconfig/up options modifiedn2021-09-19 10:15:37 OPTIONS IMPORT: route options modifiedn2021-09-19 10:15:37 OPTIONS IMPORT: peer-id setn2021-09-19 10:15:37 OPTIONS IMPORT: adjusting link_mtu to 1640n2021-09-19 10:15:37 OPTIONS IMPORT: data channel crypto options modifiedn2021-09-19 10:15:37 Outgoing Data Channel: Cipher 'SMS4-CFB' initialized with 128 bit keyn2021-09-19 10:15:37 Outgoing Data Channel: Using 160 bit message hash 'SHA1' for HMAC authenticationn2021-09-19 10:15:37 Incoming Data Channel: Cipher 'SMS4-CFB' initialized with 128 bit keyn2021-09-19 10:15:37 Incoming Data Channel: Using 160 bit message hash 'SHA1' for HMAC authenticationn2021-09-19 10:15:37 net_route_v4_best_gw query: dst 0.0.0.0n2021-09-19 10:15:37 net_route_v4_best_gw result: via 192.168.58.1 dev enp0s3n2021-09-19 10:15:37 ROUTE_GATEWAY 192.168.58.1/255.255.255.0 IFACE=enp0s3 HWADDR=08:00:27:40:f3:90n2021-09-19 10:15:37 TUN/TAP device tun0 openedn2021-09-19 10:15:37 net_iface_mtu_set: mtu 1500 for tun0n2021-09-19 10:15:37 net_iface_up: set tun0 upn2021-09-19 10:15:37 net_addr_ptp_v4_add: 10.8.0.6 peer 10.8.0.5 dev tun0n2021-09-19 10:15:37 net_route_v4_add: 1.1.1.0/24 via 10.8.0.5 dev [NULL] table 0 metric -1n2021-09-19 10:15:37 net_route_v4_add: 10.8.0.1/32 via 10.8.0.5 dev [NULL] table 0 metric -1n2021-09-19 10:15:37 Initialization Sequence Completedn
啟動后可以看到幾個信息

第一階段 tls協商采用的算法為 ECDHE-SM2-WITH-SMS4-SM3
2021-09-19 10:15:37 Control Channel: TLSv1.2, cipher TLSv1.2 ECDHE-SM2-WITH-SMS4-SM3, peer certificate: 256 bit EC, curve sm2p256v1, signature: SM2Sign-with-SM3
第二階段 數據傳輸隧道加密算法為 SMS4-CFB
2021-09-19 10:15:37 OPTIONS IMPORT: data channel crypto options modified
2021-09-19 10:15:37 Outgoing Data Channel: Cipher 'SMS4-CFB' initialized with 128 bit key
2021-09-19 10:15:37 Outgoing Data Channel: Using 160 bit message hash 'SHA1' for HMAC authentication
2021-09-19 10:15:37 Incoming Data Channel: Cipher 'SMS4-CFB' initialized with 128 bit key
這樣基于國密算法的OPEN**N環境就搭建好了
5、國密算法加密隧道驗證
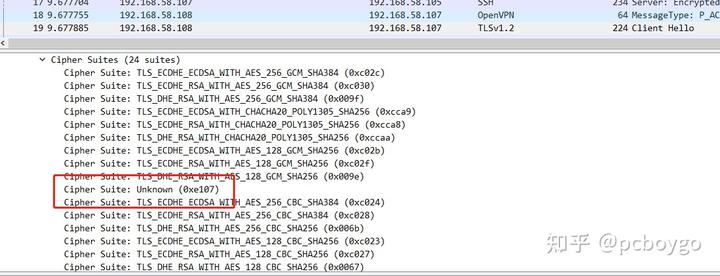
采用wirshake抓包查看采用的加密算法:
在客戶端或服務端,采用tcpdump 進行抓包,將抓包文件 用wirshake進行分析

并申明簽名算法為
algorithmIdentifier (iso.2.156.10197.1.501)
Algorithm Id: 1.2.156.10197.1.501 (iso.2.156.10197.1.501)
通過算法標識符查看對應的算法
OIDs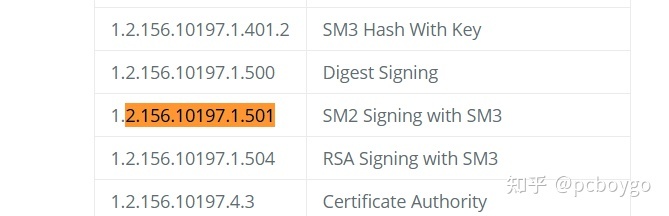
找到以后確認雙方第一階段秘鑰協商簽名算法采用的是 signature: SM2Sign-with-SM3
ECDHE-SM2-WITH-SMS4-SM3
暫時先寫到這里,希望大拿們有時間幫我多指正,在這里感謝 git上的大佬,感謝國內http://bing.com 與 GMssl團隊。
這個實驗踩了無數坑,所以總結一下,在知乎發片文章
國產化編譯參考以下鏈接
國產化飛騰架構銀河麒麟編譯國密算法加密隧道 - pcboygo的文章 - 知乎 https://zhuanlan.zhihu.com/p/609963252
上一篇:HSP-15是一種高速工具鋼
下一篇:OU2562S型顯微維氏硬度計